

Fungi Microscopy
A beginners guide to microscopy for the citizen scientist.
Identifying macrofungi can be difficult in the field. At some point you will need to investigate your mushroom further and microscopy is just what you need. After carefully collecting your sample from the field, bring it home and get to know your fungi. Here are some tips on choosing and using a microscope for this purpose.
A childs microscope is ok for looking at prepared slides of plants and animal parts, but fungi structures are so small you will need a better microscope to observe them. X-ray microscopes are wonderful for discovering details in fungi cells but are too expensive for the hobbyist. A better option is to look at optical microscopes that can go to x1000. I often use a combination of x100, x400 and x1000 to view everything on my slide.

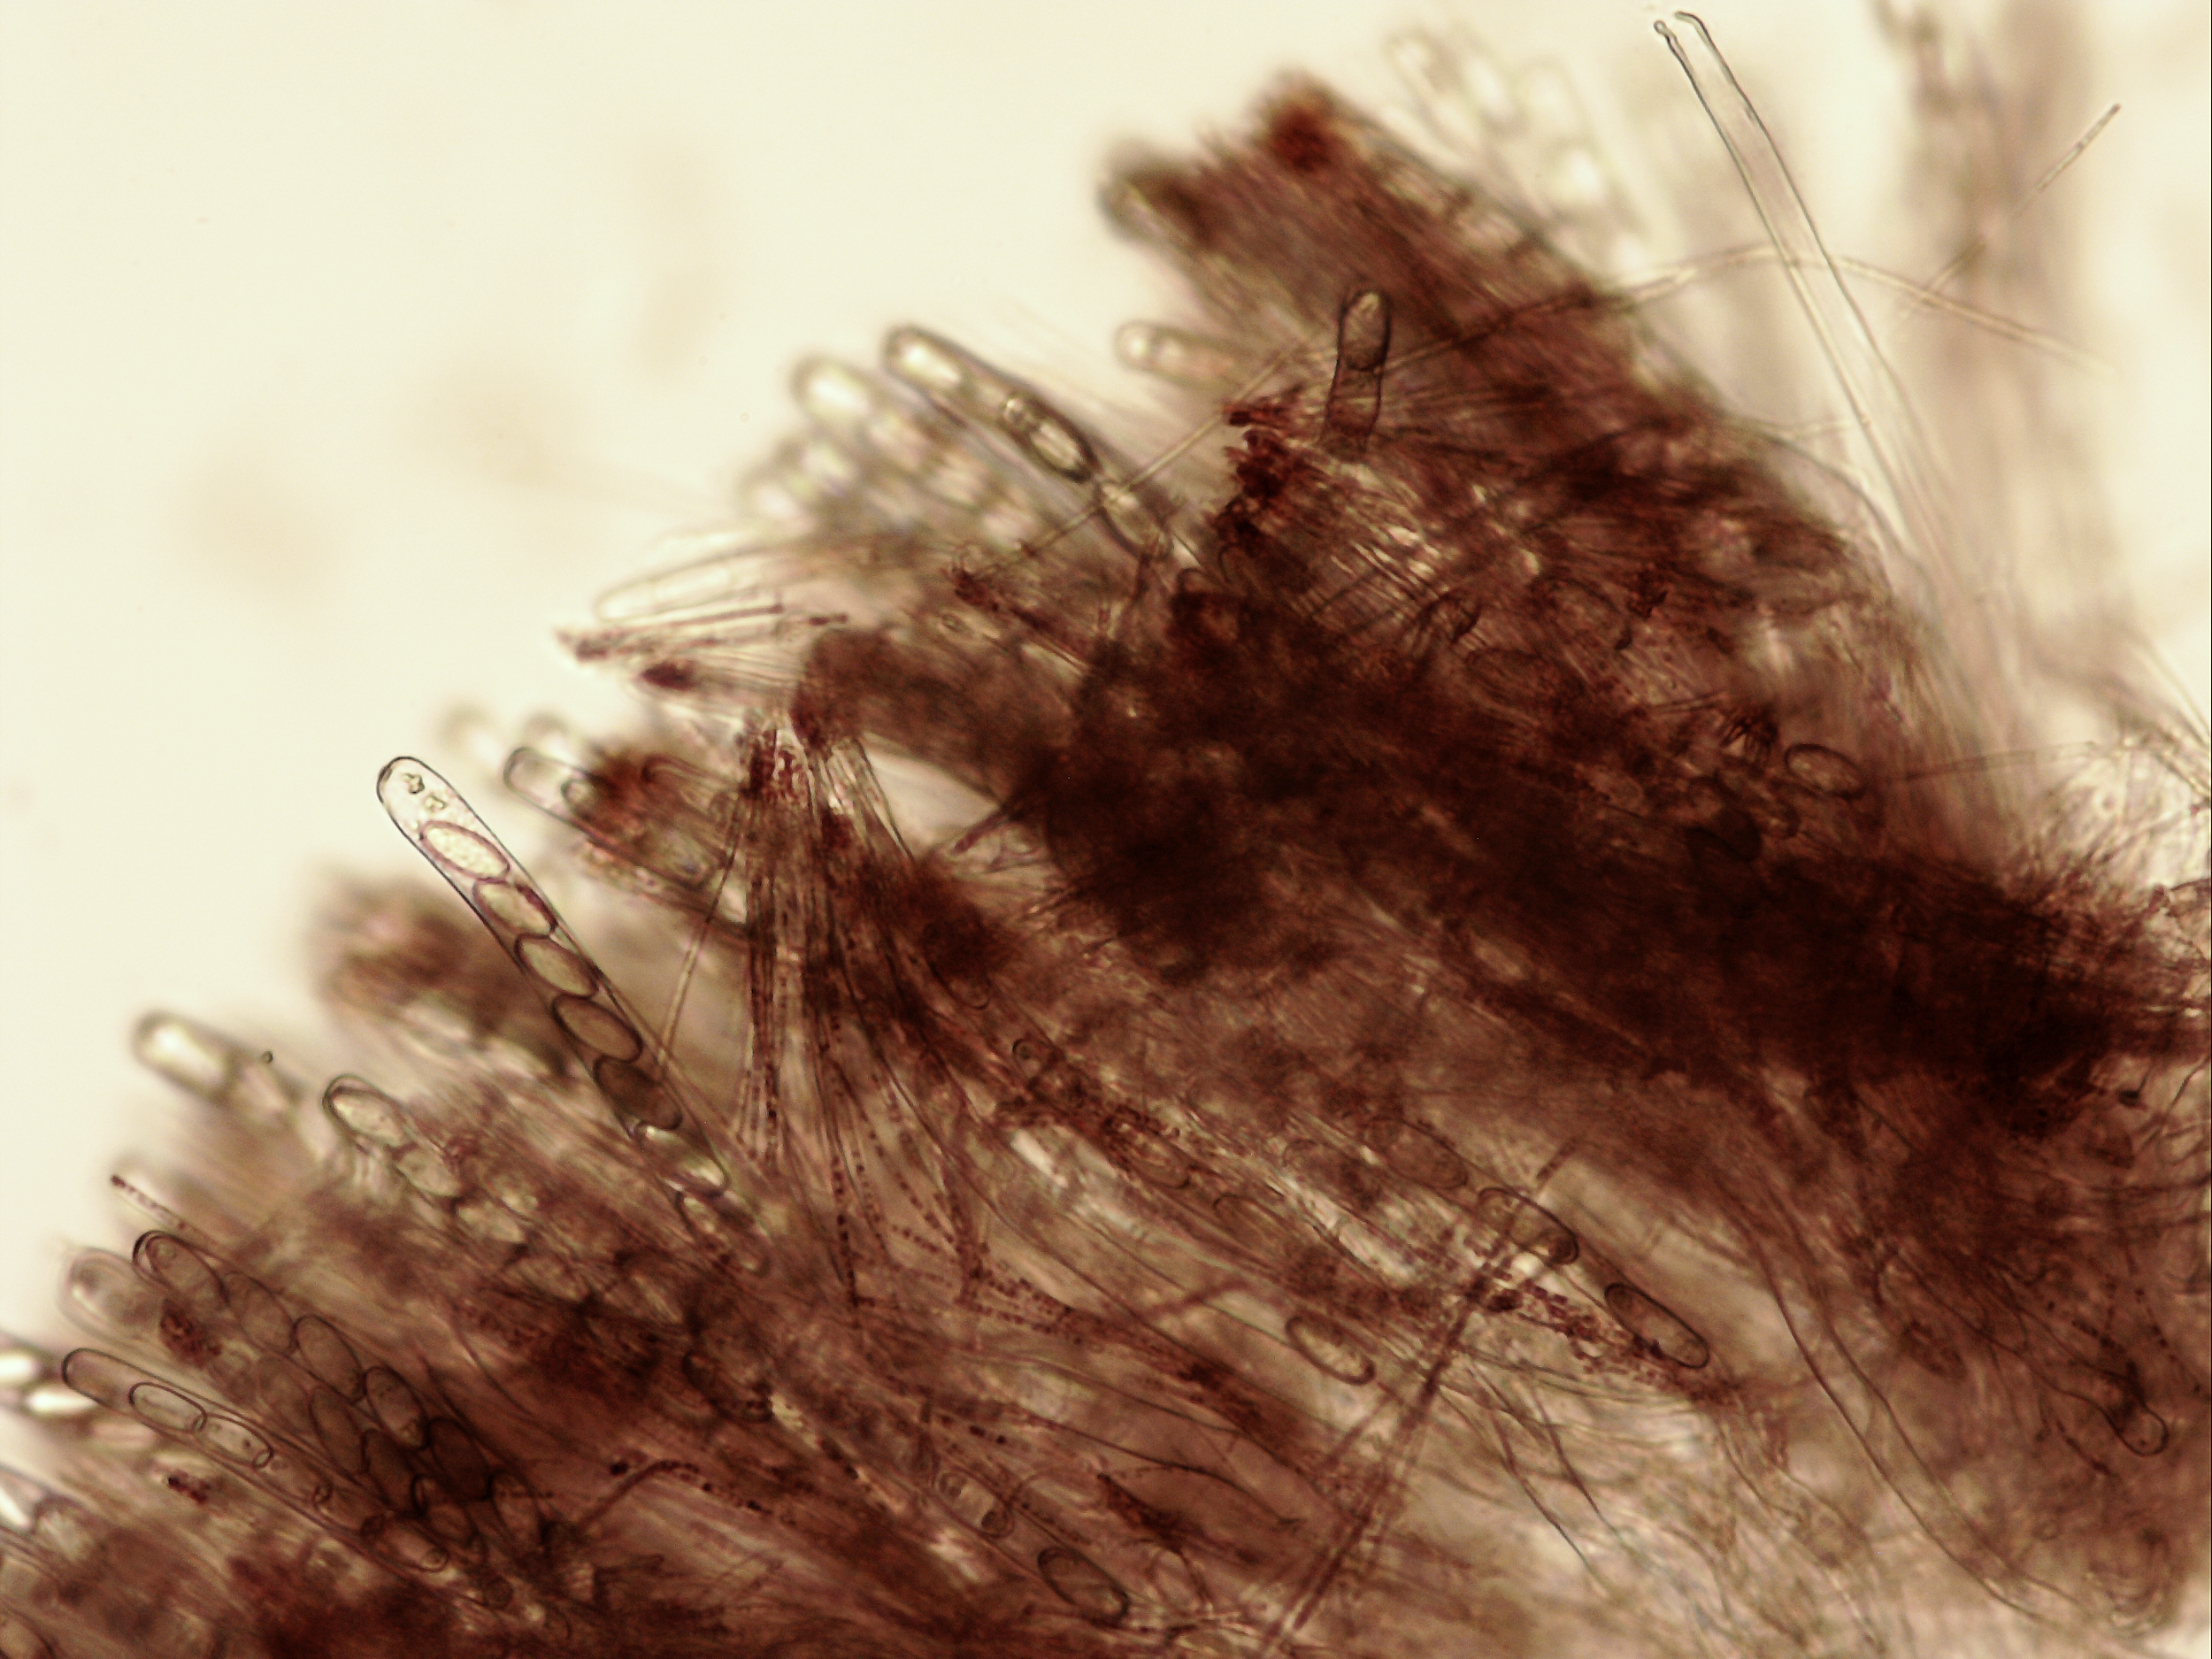
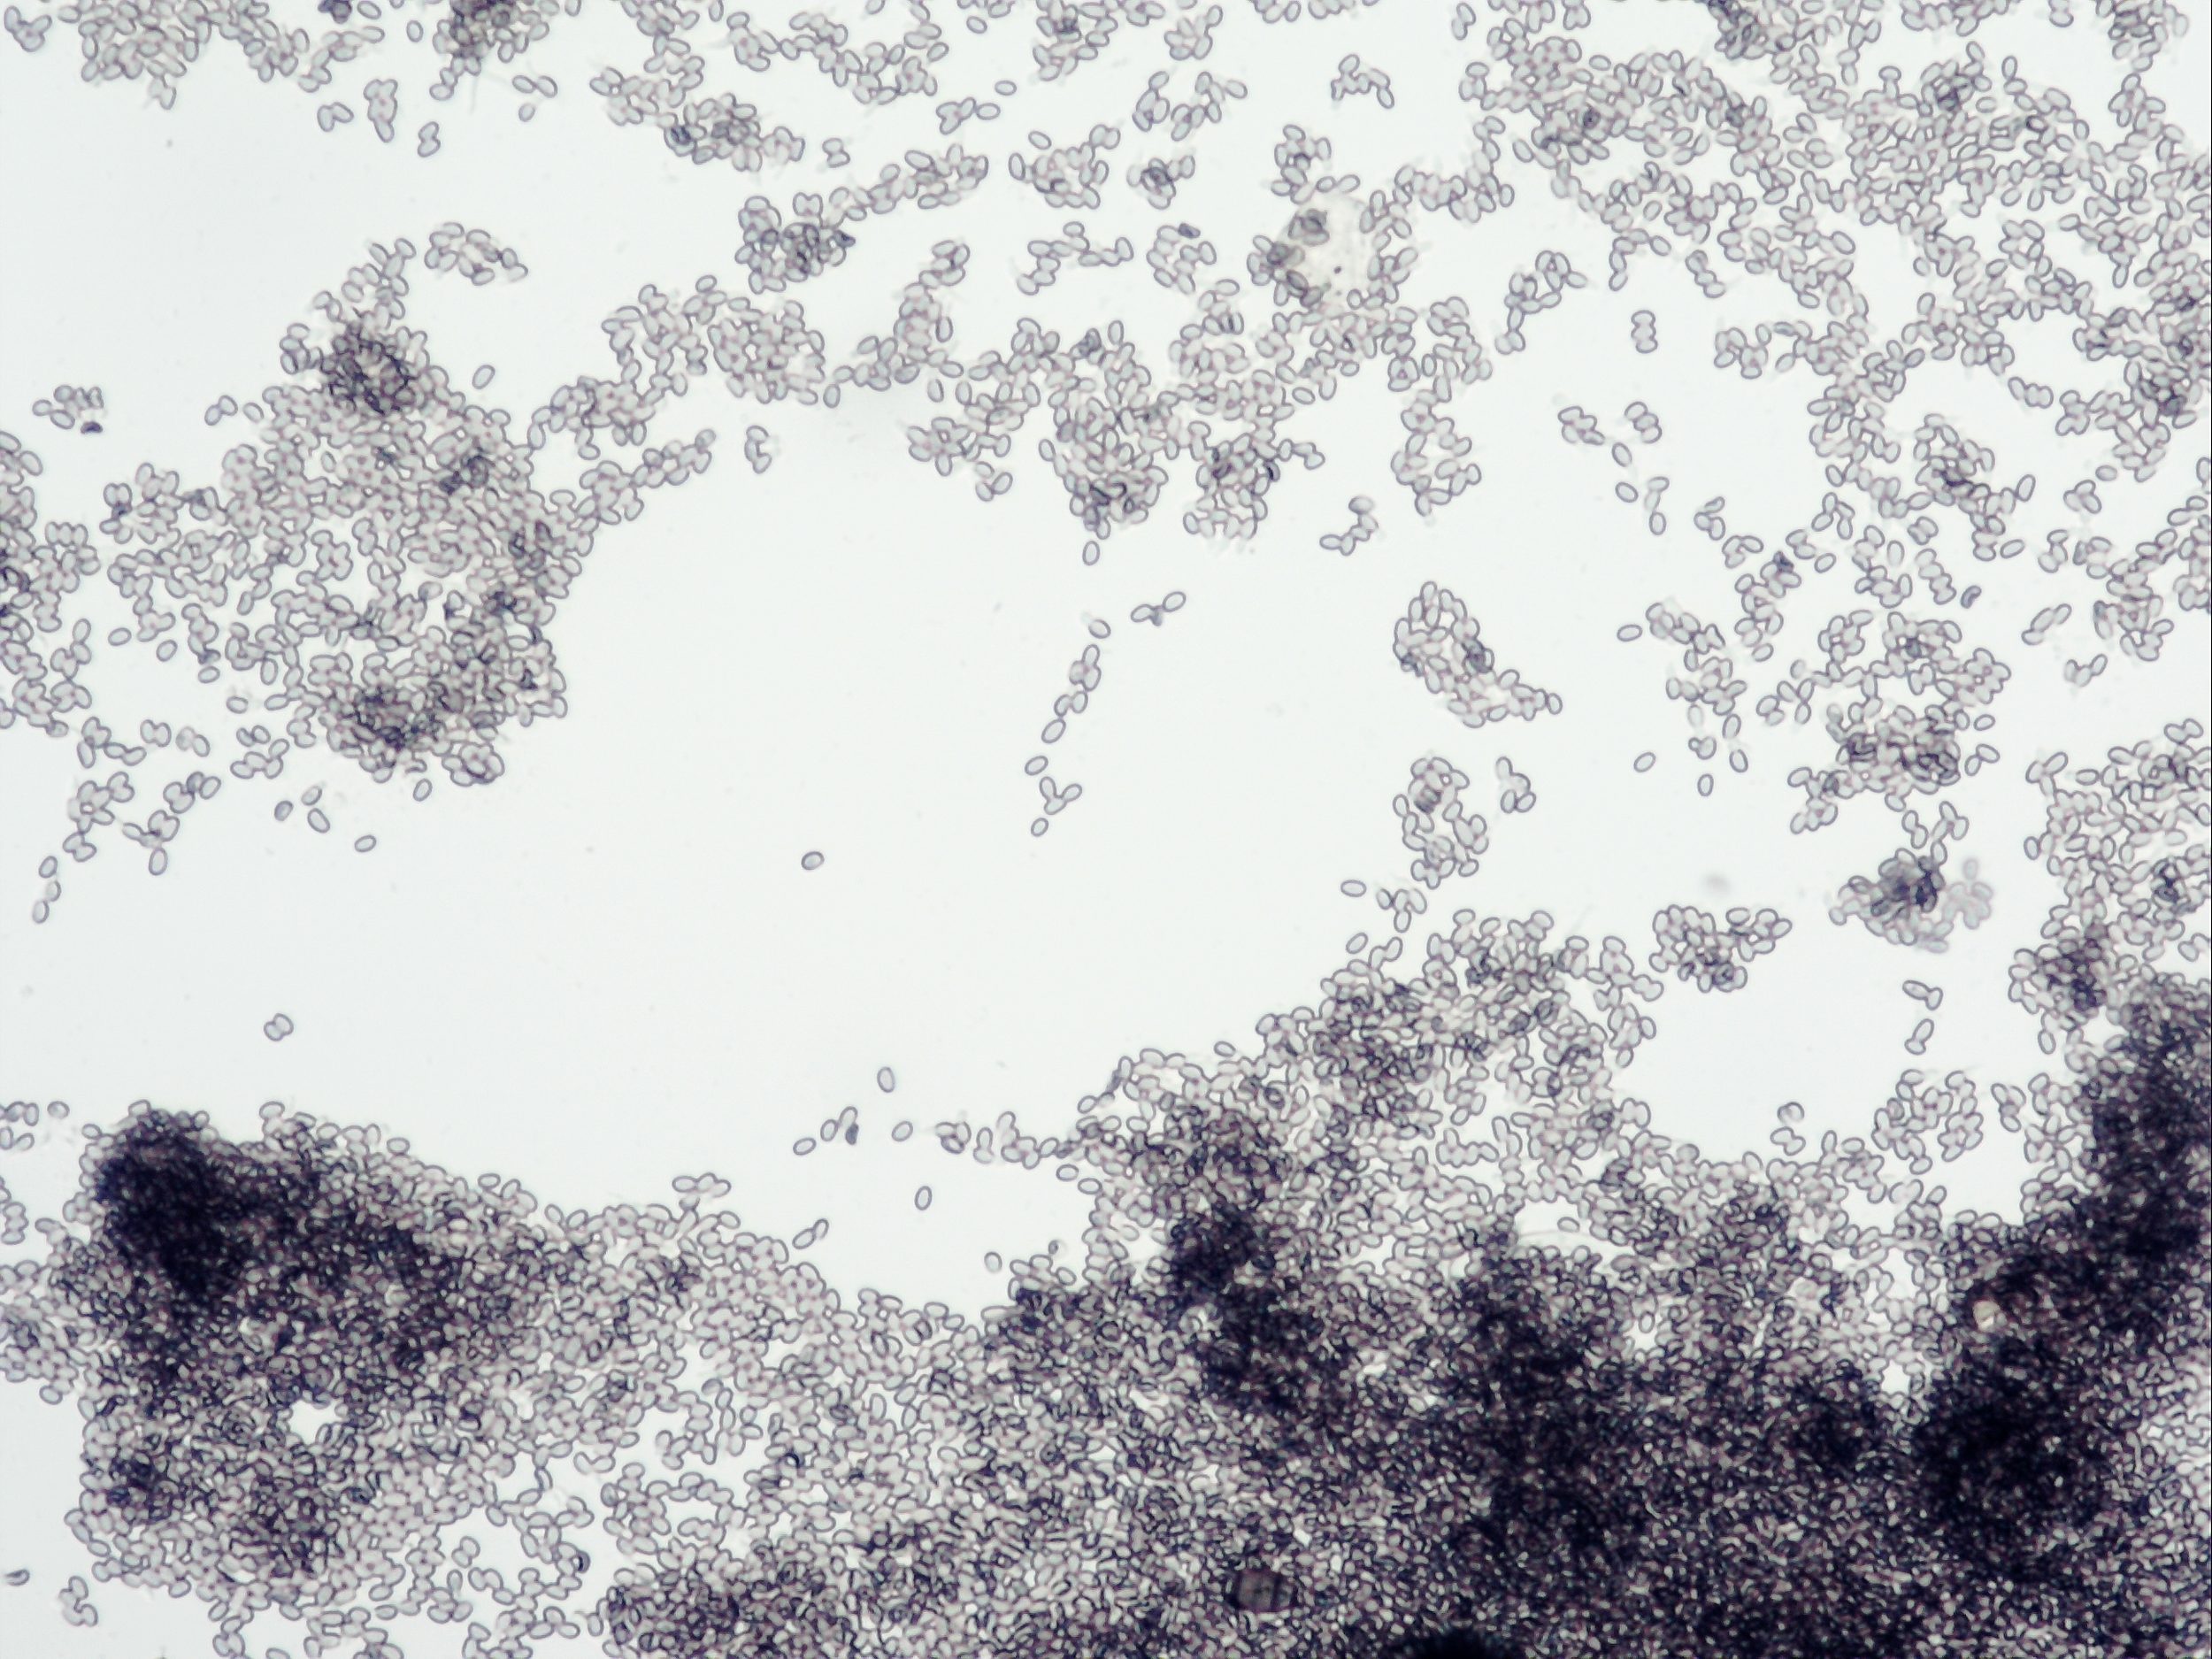
This image was taken of the Plectania milleri spores still in the ascus at x400.
Selecting a Microscope
To see fungal spores, asci, basidia, cystidia, sphaerocysts, paraphyses and other tiny features of fungi you will need a microscope that magnifies to at least x 400. To get reasonably clear images at such high magnification like x1000, it should have an oil immersion lens.
Dimensions and ornamentation of spores are key identifying features of fungi. To measure the dimensions of spores that you are looking at you will need an eyepiece that has an ocular micrometer. You will need to calibrate that ocular micrometer with a slide micrometer. See the instructions below on calibration.
My own microscope is an old Nikon binocular microscope. I have adapted it to add an ocular 5mp camera that plugs into my computer, and an ocular eyepiece in the other one. This allows me to look into the scope to orient myself on the slide, and measure things, as well as get good photos to add to my observations on iNaturalist. There are trinocular microscopes that have two eyepieces plus an extra ocular space for a digital camera. You can find student microscopes from AmScope with a camera for under $500.
Other ‘must-have’ microscope features include:
Adjustable illumination, most often from directly below the slide, and termed brightfield illumination. Often the light source will move closer to the slide, some microscopes will also add an aperture closure to fine control.
Control knobs for moving the mechanical stage that holds the slide. This will move the slide front to back and side to side.
Coarse and fine focus controls. This focuses the image. You will start at your lowest magnification to find your matter, and use the focus controls to make the image clear. Then use the fine controls to see the details in precise detail.

Chemicals, Stains and Reagents
The structure of spores and many of the other tiny parts of fungi that you will want to look at under the microscope are almost completely translucent. To help see the district ornamentation and aid in identification it is helpful to use stains and reagents. Chemical changes in color that happen when fungi parts come in contact with certain chemicals are called reagents. Here are some commonly used stains and reagents used in mycological microscopy:
Reagents and Chemicals
Distilled water (DI water)
If you want to view tiny subjects and see their natural (mostly translucent) colors, water is the ideal way to mount the specimen. Tap water contains chemical additives that could limit the lifetime of a slide, and rainwater is acidic and equally problematic, but distilled water is inexpensive and readily available.
Ferrous sulphate (FeSO4)
Many fungi citizen mycologists carry in their field kit a crystals of Iron Salts, for wetting and rubbing on fungi, like Ramaria, to check for a color reaction. Don’t go to the expense of buying pharmaceutical grade crystals; the stuff sold in garden centers as a moss killer and for lowering the alkalinity of soil works just fine.
Potassium hydroxide (KOH)
This is used both as a mounting medium and as a reagent, either in the field or back at base. Cap or gill surfaces of some mushrooms change colour dramatically when contacted by KOH. The Cortinariaceae family is one of those that will often have a reaction. When you make a microscope slide using KOH not only is it preserved against decay but you may also elicit a diagnostic color reaction that can sometimes contribute as much to the identification process as do the size and shape data obtained via the microscope.
Melzer’s Reagent
This mix of chemicals is difficult to obtain because one of the crucial components is the potentially dangerous substance chloral hydrate. The other components are easy to acquire – iodine crystals, potassium iodide and distilled water. Iodine reacts with starchy substances to produce an intense blue-black color, and fungal spores that contain starch are referred to a ‘amyloid’. If you join a mycological society, they may be able to source some this important reagent for you.
Spores and some other fungal tissue go through a color change when mounted with Melzer’s Reagent. Reactions are termed:
Amyloid if they turn a blue-black color. “Starch and iodine form helical coils with the iodine atoms fitting into the coils forming an amylose-iodine complex (www.park.edu/bhoffman.com) and hence an “amyloid” reaction. The reaction with starch is blue-black and a brown-blue color with glycogen.”
Dextrinoid if they turn a reddish-brown color. “Blackwell et al (2001) suggested that the red reaction does not involve starch or amylose, but is a reaction with glycine betaine, an “osmolyte” (an organic osmotic solute) which they found in high concentrations in the Basidiomycetes they studied. Betaine functions to attract water to the rapidly enlarging and differentiating basidi- omata. The addition of iodine presumably results in a “glycine betaine-IKI complex.” Baral (1987; personal communication, 2004) noted that the dextrinoid reaction is “strongly enhanced” by chloral hydrate.”
Inamyloid (or negative) no color change, the whole slide will just have a yellow tinge because of the iodine.
These terms are used in field guides that list the chemical tests for each species.
Lugol’s solution
(also known as Aqueous Iodine Solution or Strong Iodine Solution at times written as IKI)
Can be used as a substitute for Melzer’s Reagent.
Used medically to disinfect water and to protect the thyroid when using iodine for imaging. The formula provided by the Maine Medical Center Pharmacy is 5 g of iodine crystals and 10 g of potassium iodide in100ml water. Warning: it should be labeled “poisonous, for external use only” and contact with it should be avoided by people with iodine allergies or thyroid disease.
Hemiamyloid: This is a red reaction with Lugol’s reagent.
This paper looks at the difference in Lugol’s vs Melzer’s Melzer’s, Lugol’s or Iodine for Identification of White-spored Agaricales? by Lawrence M. Leonard
Or this paper on Lugol’s https://in-vivo-veritas.de/articles/iodine-reaction-in-ascomycetes-why-is-lugols-solution-superior-to-melzers-reagent/
Stains
The main reasons for using stains when making microscope slides are to:
enhance the contrast in a microscopic view
highlight particular cell structures
Examples of staining agents include:
Congo Red
An excellent general-purpose stain for looking at the fine details of hyphal structures. It is supplied as powder and is best dissolved in a 10% ammonia solution.
Safranin
Another stain that produces red cell nuclei.
Lactophenol Cotton Blue
This stains chitin, making such structures as spore ornamentation show up much more clearly than they do with most other stains (including Congo Red).
The chemicals mentioned above include some seriously caustic, acidic and toxic substances, and they must be stored where children can’t get hold of them. The fumes from ammonia, for example, can burn eyes. Chemicals like KOH and Melzer’s Reagent should never be mixed. Make sure to mount separate slides if you want to see reactions from KOH and Melzer’s.
Calibration
Before you can measure spores with your microscope you will need to calibrate it for every objective. Make sure to recalibrate after cleanings too.
To calibrate your microscope you will need:
stage micrometer
eyepiece reticle
When looking through the microscope, the reticle image is imposed upon your specimen image in a unit measurement. You will need to take a measurement of the spaces the spore takes up and then multiply those units by the number you get from the calibration to get a measurement in micrometers.
So for a compound microscope with 3 objective lenses, you will have 3 different calculations to make depending on what objective you are using. My microscope has X10, X40 and X100. So if I am looking at a spore with the x40 objective, I will use the calibration number X the units on the eyepiece reticle to get my measurement in micrometers.
To properly calibrate your reticle with a stage micrometer place the stage micrometer on the stage and install the reticle. Starting with your lowest objective, align the zero line (beginning) of the stage micrometer with the zero line (beginning) of the reticle. Now, carefully scan over until you see the lines line up again. Count the number of spaces of the stage micrometer between the lines which coincide at the left and right.
The stage micrometer is 1 mm long (1000 um) with 100 divisions so each division of the stage micrometer is one one-hundredth of a mm. The eyepiece micrometer is divided into 100 units. We don't need to know the actual distance between marks on it. Since each space of the stage micrometer equals .01mm or 10um (should be written on the slide), each space of the eyepiece reticule will equal 1 unit times the calibration calculation.
Remember, this distance between reticle lines is only good for that particular objective lens and it may not come out to be a nice round number. When you switch to a different objective, you must recalibrate.
Let’s say you are calibrating a 4x objective with a 10x ocular piece for a total of 40x magnification. The stage micrometer which equals 1000um equals exactly 40 units in the eyepiece reticle. So let’s do some math:
40 eyepiece units= 1000um
1 eyepiece unit= ? um
cross multiply
1 eyepiece unit X 1000 um= 40 eyepiece units x ? um
simplify by dividing both sides of equation by 40 eyepiece units
1000um/40 = ? um
solve
=25 um
So what this is saying is that one eyepiece unit is equal to 25 um. When you measure a specimen and let’s say it is 6 units long, you will then need to calculate 6x25 to get the actual micrometer measurement.
Now calibrate for each objective and write the values on a piece of paper and tape it to your microscope. Now you will always have the multiplier to measure spores!
Stage micrometer
https://www.microscopeworld.com/p-1457-reticle-ruler-1mm-100-divisions.aspx
https://www.amazon.com/Microscope-Micrometer-Eyepiece-Calibration-Measuring/dp/B08GFR43JX/ref=sr_1_14?crid=DC62YW90AFNM&keywords=microscope%2Bcalibration%2Bslide&qid=1658604854&s=digital-text&sprefix=microscope%2Bcalibration%2Bslid%2Cdigital-text%2C139&sr=1-14&th=1
Making Slides
When just beginning it is a good idea to just look at a spore deposit under the microscope so you can see what the spores look like. To prepare this slide, place a glass slide on a piece of paper, and place the mushroom (gill-side down) on the slide. I leave the mushroom on there for at least an hour, so I can also see what color the spore deposit is. To see the spores under the scope, add one drop of DI water, place a cover slip on that and mount the slide on to your microscope.
Next you can mount the slide in some Melzer’s reagent. Before placing this under the scope hold it up to the light and see if you can see the amyloid, dextrinoid or inamyloid reactions. Once you look at the spores under the scope you should be able to see any ornamentation because of the contrast Melzer’s reagent provides.
Making slides from very thin slices of fungal tissue is more difficult. You want the fungal tissue to be so thin it does not raise the cover slip of the slide. You should expect more failures than successes. This is why I often slice my specimen at least 15-20 times and then choose the thinnest piece from the bunch. The thinner the slice, the less things will looked stacked and layered under the microscope. You will be able to see cells better with thinner slices. On the gills of a mushroom you might take a cross section to study the basidia, cystidia, trama and spores. When sectioning an Ascomycete, you will need to make sure to take a cross section of the hymenium to the abhymenium surface, so you will see the asci laying flat on the slide. If you try and section just the fertile surface, you will cut the asci and not be able to study them in the cells.
If you are not as concerned with studying the flesh structure of the fungi, you can take a piece of tissue and squash mount it. This is sort of hit and miss, but sometimes it works. Take a piece of tissue with some needle nose tweezers and add some stain or DI water to the tissue. Take your cover slip and smash the tissue with the liquid to your slide. Just be careful not to press too hard, as you could break the cover slip or even the slide. I often squash mount jelly type fungi, since they are so hard to section.
When studying basidiomycetes under a microscope you can look at various kinds of cystidia. These are hyphal structures that stand out from various surfaces. Depending on where they occur they are given different name and they look quite different: pleurocystidia occur on gill faces, cheilocystidia are those on the gill edges, pileocystidia occur on the cap surface, and caulocystidia are those found on the stem of the mushroom.
“As William Bateson, who coined the word genetics, observed, “We commonly think of animals and plants as matter, but they are really systems through which matter is continually passing.”
—Merlin Sheldrake, Entangled Life: How Fungi Make Our Worlds, Change Our Minds & Shape Our Futures